
Scope Holdover guide
How to record air rifle holdover and holdunder
Make a hold record for each pellet you use. The Scope Holdover target gives you three or four distance columns, each with an aim point and a scale matched to your reticle settings and that column's shooting distance.
Confirm your zero and shoot a group at each distance. Record the holdover or holdunder to use on future targets at those distances without adjusting your turrets. Keep the completed sheet as a reference for that rifle, pellet and scope setup.
Free PDF download. No account required. A4 or US Letter.
What we mean by a hold
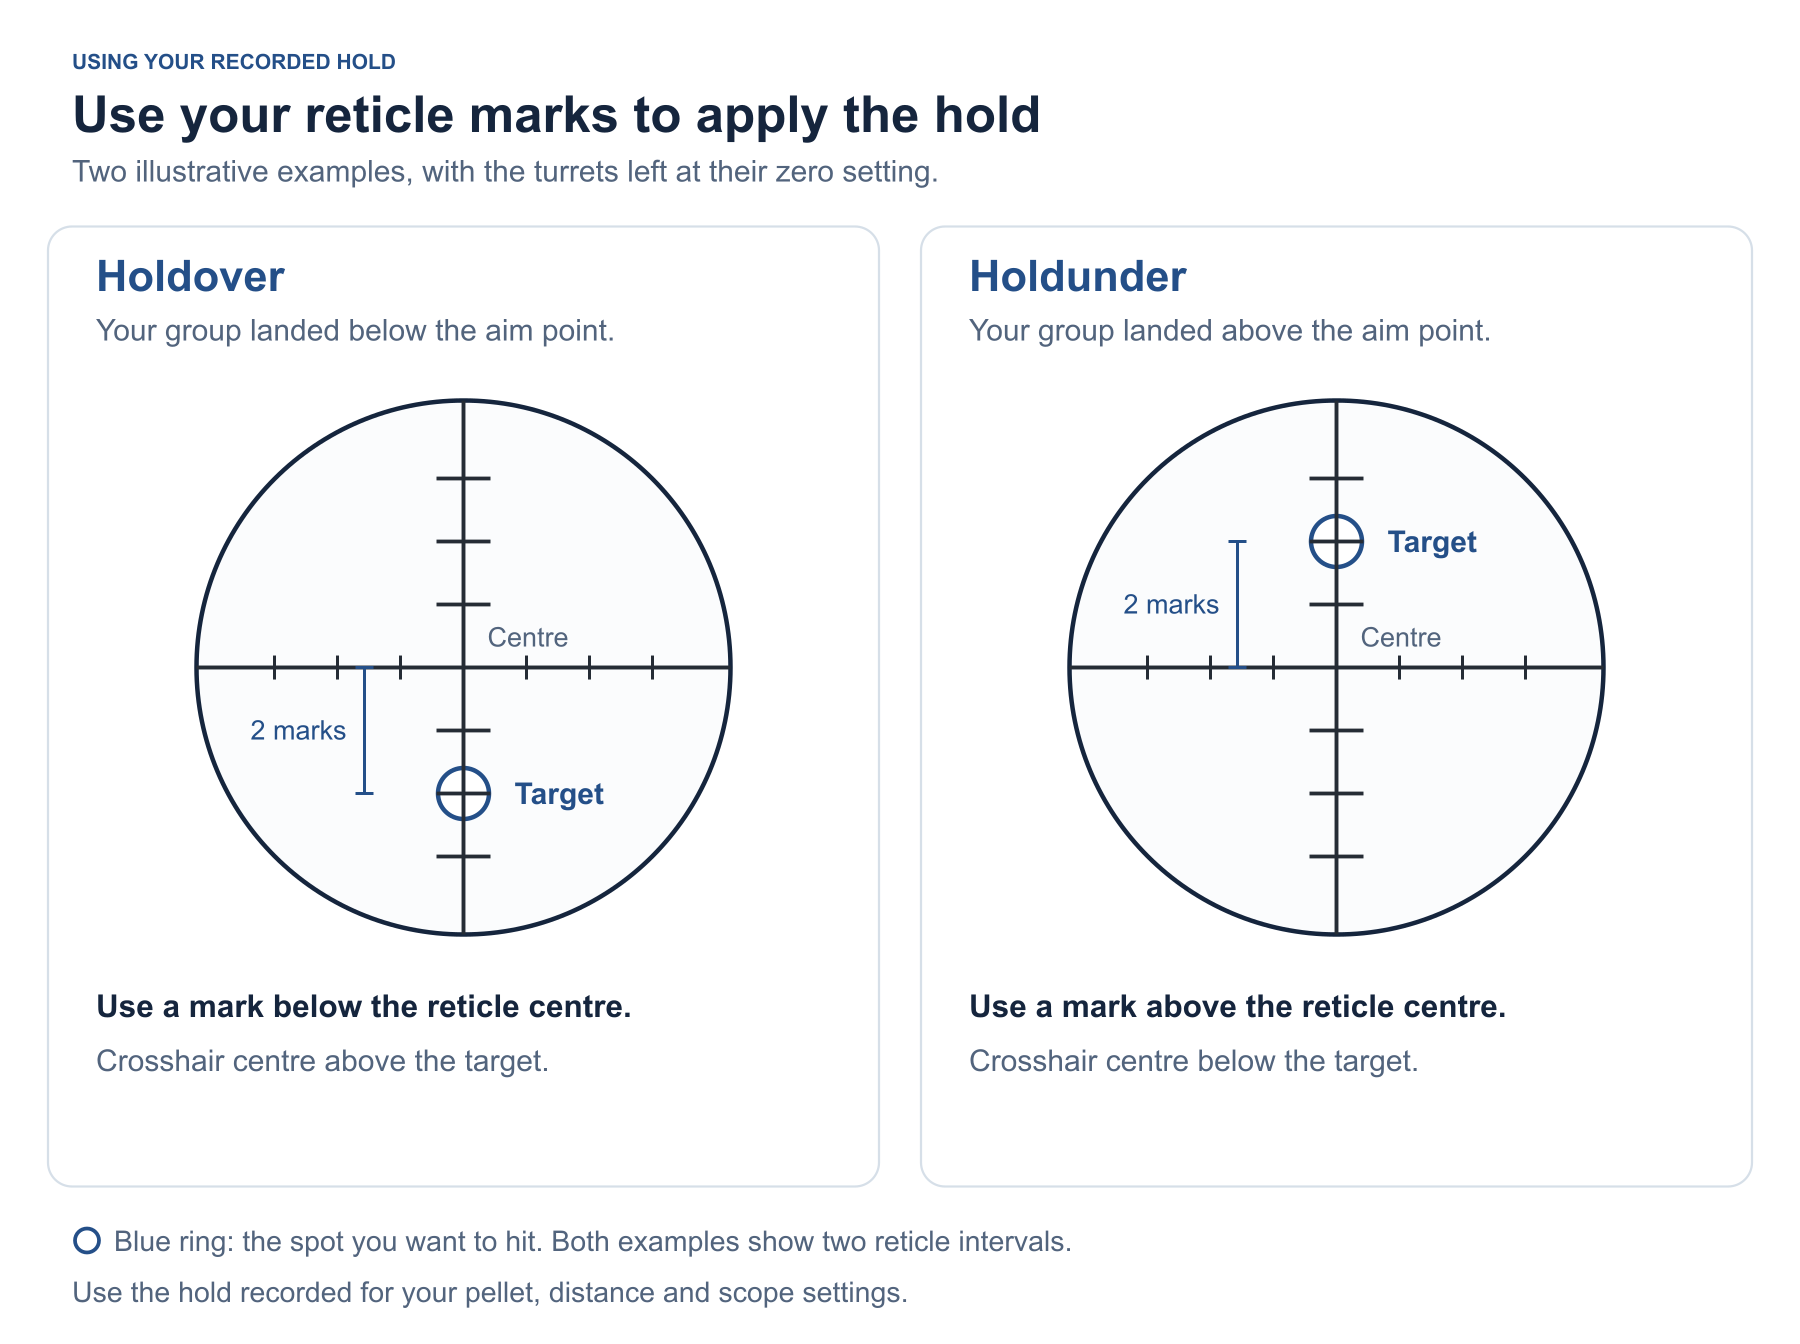
A hold is how far you aim above or below the spot you want the pellet to hit, while leaving the scope's turrets at their zero setting.
- Holdover: If your pellets land low when you aim with the central crosshair, you aim that crosshair higher to compensate.
- Holdunder: If your pellets land high, you aim the central crosshair lower to compensate.
The dots or lines in your scope's reticle give you references for repeating that correction. For example, two marks of holdover means placing the reticle mark two intervals below the centre on the spot you want to hit. The central crosshair then sits above that spot.
Choose your distances and match your reticle
Open the Scope Holdover generator. Choose three or four distance columns and enter the distances you intend to check, using either metres or yards throughout.
Each column has its own scale. Use it only at the distance printed above it.
Next, match the sheet to your scope:
- Reticle unit: Choose MIL or MOA to match the reticle markings you will use.
- Reticle spacing: Choose the angular gap between those regularly spaced markings. Check your scope's reticle diagram for the value. This is separate from the turret's click value.
- Focal plane: Select FFP (First Focal Plane) or SFP (Second Focal Plane), as specified for your scope.
For an SFP scope, enter both the calibration power specified for that spacing and the working power you will use when shooting. They can be different. Keep the scope at that working magnification when collecting and using this hold record: changing magnification changes the angle covered by each reticle interval.
For an FFP scope, the angular spacing stays the same as you change magnification, so the generator needs neither power setting.
The available spacings are 1, 0.5 or 0.2 MIL, and 0.5, 1 or 2 MOA. If your chosen markings use another spacing, do not substitute the nearest option. Some reticles also change spacing along the scale; use only the regular section that matches your settings.
Distances and SFP powers must be whole numbers. If your actual settings are unsupported or the generator cannot fit their scale, use another recording method. Keep the entered values matched to your setup.
Print and measure the sheet
Choose A4 or US Letter, check the preview and select Download PDF. Print the downloaded PDF in portrait at Actual size or 100%, with the matching paper size. Turn off Fit, Shrink and borderless expansion.
Before using the target, measure its vertical verification scale with a ruler. The zero-to-50 mm ticks must be 50 mm apart; the zero-to-2 inch ticks must be 2 inches apart. These are separate tick positions.
If the measurement is wrong, correct the print settings and print again before reading holds from the grid. See the PDF printing guide for help with printer settings.
Confirm zero with the pellet you are recording
Use the pellet you want to record and confirm the rifle's zero at your chosen zero distance. Then leave the elevation and windage turrets at that setting while collecting the distance groups.
Fill in the sheet's rifle, scope, pellet make/model, weight, head size, zero distance and date fields. Use Notes for details such as conditions or a rifle power setting you need to identify later.
Use a separate sheet for each pellet and setup. When you change pellets, establish zero for the new pellet before making its hold record. Recording the same distances and zero distance on each sheet makes the resulting references easier to compare.
Shoot the matching distance column
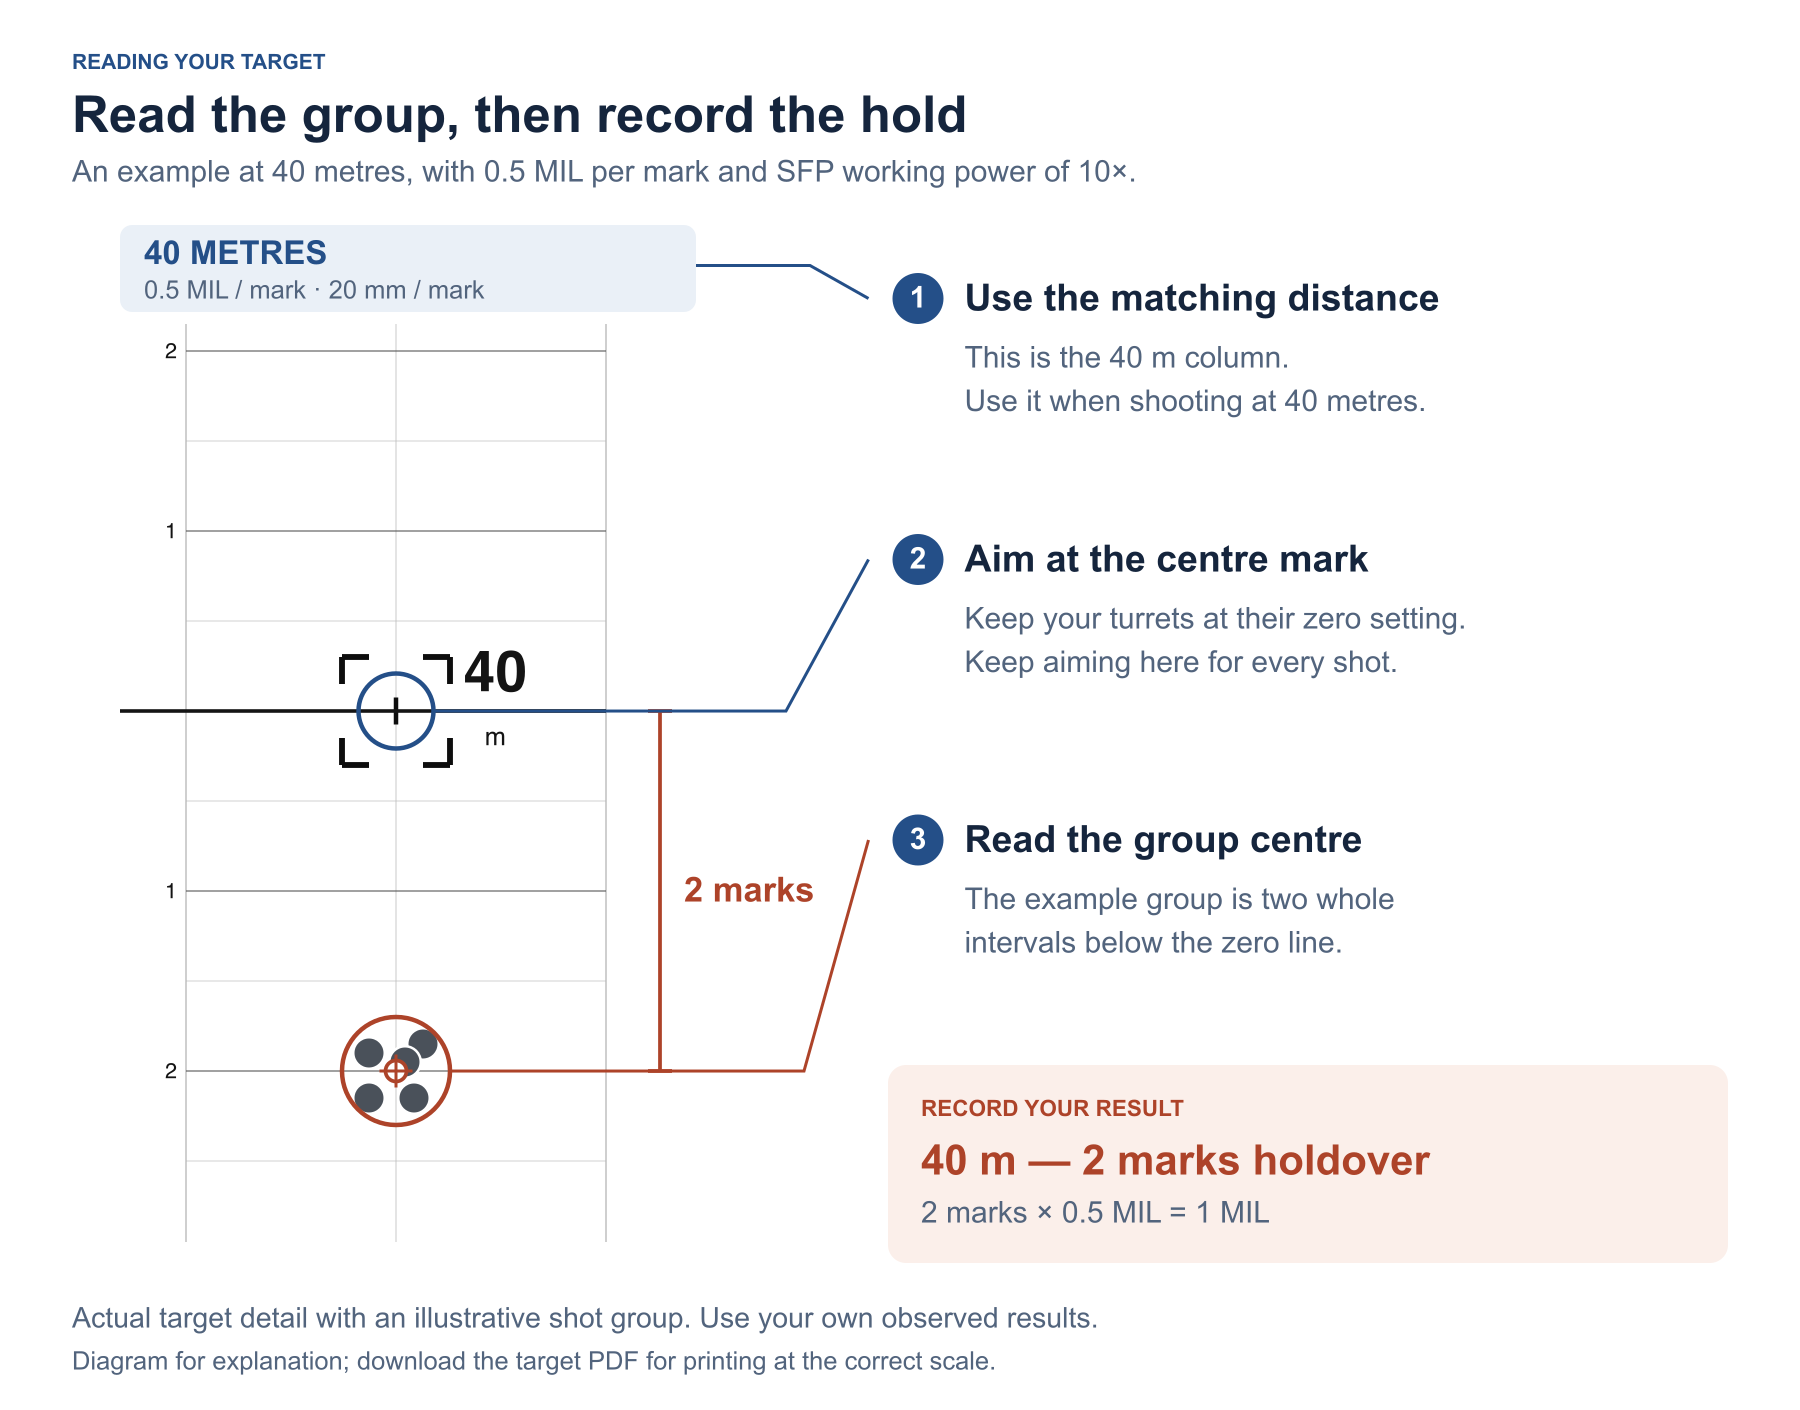
At each measured distance, use the column labelled for that distance. Place the centre of your reticle on the column's aim point and shoot a group, keeping the same aim for every shot.
Leave the turrets at the settings you used to zero the rifle. Keep aiming with the centre of the reticle, even if the pellets land high or low. For an SFP scope, use the working magnification printed on the sheet.
Mark the approximate centre of the group. Read its vertical offset from the bold zero line through the aim point, using that column's scale. Use the group centre rather than choosing one pellet hole.
Record the hold and its direction
The scale tells you how far the group landed above or below the aim point. The hold tells you how to compensate.
| Group centre | Hold to record | Reticle reference to place on the aim point |
|---|---|---|
| Below the aim point | Holdover | A mark below the reticle centre |
| Above the aim point | Holdunder | A mark above the reticle centre |
| Level with the aim point | No vertical hold | The reticle centre |
With holdover, the reticle centre sits above the aim point. With holdunder, it sits below.
The printed numbers count reticle intervals. They are not turret clicks or automatically whole MIL or MOA values. The subheading in each column shows the effective angular spacing at your working power. For example, if it says 0.5 MIL per mark, a reading of 2 means two intervals, or 1 MIL.
Where the sheet shows lighter halfway guides, they divide a whole interval in half. Some numbers may be omitted to keep a fine scale readable; the remaining labels retain their actual counts.
Write both the count and the direction beside the group. An illustrative entry might be “40 m — 2 marks holdover”. Use your own observed result for each distance.
Check the hold before keeping it as a reference
At the same distance, use a fresh aim point and shoot another group using the reticle hold you recorded. Keep the same pellet, zero and, for SFP, working magnification. Check where that group lands and repeat if the result is unclear.
Repeat for the other distances. If you need more than four distances, make another sheet and label it with the same setup details.
Keep the completed sheets or photograph them. The short code and QR code restore the blank sheet's settings, including its distances and reticle calibration. They do not save pellet details, shot groups or handwritten holds. Save the downloaded PDF too if you want to reprint that exact file.
Read each result at the distance you tested
A shorter distance does not automatically mean holdunder: air rifles can need holdover at close distances too. Read the group's position rather than choosing a direction from the distance alone.
The sheet records what you observe with your setup. Check additional distances on the range before adding them to your reference; the target does not predict holds between the distances you tested.
Create a hold record for your next pellet
Choose your distances, match your scope settings and download a sheet for your next range session.
For separate aim points when comparing pellet groups, see the pellet-testing target guide.